SCCMinfo

SCCM Server Setup Wizard – List installation requirements

To save time, confusion and to have clarity, please consider below inputs and be ready with the information in handy for installing Configuration Manager Central Administration Site or Primary Site.


  1. Decide on Site to be selected, Central Administration Site or Primary Site
  2. Be ready with the license product key to be entered
  3. Be ready with setup downloaded file with Setup Downloader. With this you do not require to download at the time of Site installation, you can select previously downloaded files by giving path of those files.
  4. Server Language selection would be by default as English which cannot be changed.
  5. Client Language selection would be by default as English which cannot be changed.
  6. Be ready with the Site Code to be used. Each Site code must be unique.
  7. Be ready with the friendly and easily identifiable Site Name accordingly to the Site you would want to be known.
  8. Decide on folder path for the installation as it cannot be changed later.
  9. Be ready with SQL server FQDN (Fully Qualified Domain Name), Instance Name, Database Name, and SSB (by default it uses 4022) port.
  10. Be ready with the path for SQL server data file and the SQL server log files.
  11. In case if you decide to install SMS Provider to be remote server then be ready with FQDN of the same else by default it takes site server’s name. Additional SMS provider server can be configured later.
  12. Be ready with input to give for client communication to site server on HTTP or HTTPS, in case to go for HTTPS for secure communication client’s computer must have valid PKI certificate.
  13. Decide on which server to be act as Management Point and Distribution Point Site System, and then be ready with FQDN for the servers.
  14. Service Connection Point to be selected in case of installing CAS or stand-alone Primary Site, at the time of installing child Primary Site this can be skipped.


Note: This information is not for installing Secondary Site as it does not support installation using Setup Wizard or by command lines. Installation of Secondary Site happens with in Configuration Manager Console.


Please share feedback in comment box.
 

SCCM Prerequisites Checker to install Configuration Manager Site and Site systems


There is small utility available in the installation media named prereqchk.exe which help us to find out the readiness details on the site server or remote site server. Make sure to use this utility from the same version of configuration manager which would be used to install site. It identifies and fix the issues which may cause site installation to fail.


It is not mandatory to run this utility before site installation, as at the time of installation it runs by default, but it is best practice to run this before site installation to fix any issues avoid any roadblock.


Up on starting this utility it first checks for any site is already exist and if yes, then it checks for upgrade reediness. And if it does not find any site then it performs all required checks.


It records all the information in the log file name ConfigMgrPrereq.log under root drive.


There are some commands line option which can be used to perform the readiness according to the site or site systems role we are going to install.


Here we see some command line options with their purpose in brief:


/CAS


This verifies the local computer meets all requirement for installing Central Administration Site server.


/MP


This verifies the local computer meets all requirement installing site systems role of Management point.


/DP (FQDN of Computer)


This verifies the local computer meets all requirement installing site systems role of Distribution point.


/SQL (FQDN of Computer)


This verifies the local computer meets all requirement to install SQL to host site database.


/PRI


This verifies the local computer meets all requirement for installing Primary Site server.


/INSTALLSQLEXPRESS


This verifies the local computer meets all requirement for installing SQL Server Express.


Note: This application or utility can be found in Configuration Manager Installation Media\SMSSETUP\BIN\X64 or Configuration Manager Installation Path\BIN\X64  


Please share feedback on this topic in comment section.

List SCCM installation requirements


Find here the top information in list manner to have an idea on before going doing the installation of SCCM site in production environment

  1. Before starting to install site please make sure you have decided on the topology.
  2. Choosing installation method would be depend on the type of site you may want to opt.
  3. The first site you install always going to be either Stand alone Primary Site or Central Administration Site.
  4. Whenever installing first site always use baseline version.
  5. After installing baseline version, it can be updated to latest one from in-console update.
  6. As installation method we can either use Configuration Manager Setup Wizard or scripted command line tool.
  7. After installation of first site, one or more site can be added any time.
  8. To install secondary site use configuration manager console as installation method of CAS or Primary are not supported to install secondary site
  9. Make sure the basic task like updating computer with latest patches, install and configure SQL server for database, hardening of server OS, preparing network environment are completed before to go for site installation.
  10. Make sure to decide on site names and codes.
  11. Be aware of limits and restriction post installation of sites like, you can not change site code, site description and installation directory. Also, you can not move primary site from hierarchy.
  12. Setup Downloader can be used to pre-download the content before installation of site.
  13. Run prerequisites checker to identify and fix the issues before start of site installations.
  14. Optional port can be identified to use to secure communication between configuration manager sites and clients.

Please share feedback in comment section

SCCM Migration Workflow Chart


Find here quick basic information on configuration manager migration process.


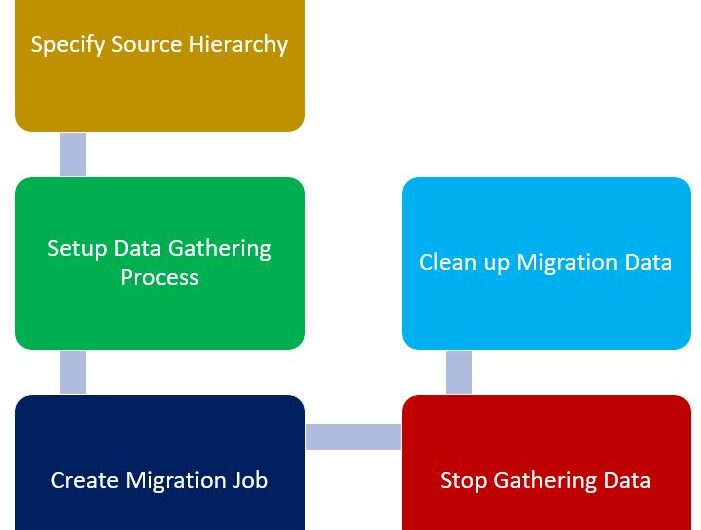
Basic Migration Workflow Chart


Quick Points on Migration

  • An existing Configuration Manager 2007 SP2 infrastructure hierarchy can be migrated to Current Branch of Configuration Manager.
  • All or some of the supported data can be migrated from old source site.
  • Data can be migrated from single source site to several different sites in new destination hierarchy of current branch.
  • Data can be moved from multiple sources sites to single destination site in new hierarchy  

What exactly happens in configuration manager migration?

In Configuration Manager migration data would be transferred from database of old hierarchy to database of new current branch hierarchy.


Migration does not do any changes in database of source hierarchy; it discovers data to be copied and provisions copy of the same in database of new hierarchy.


Terms used in Migration:

Source Hierarchy

This is the hierarchy which is running with supported version of Configuration Manager and which has data to be transferred to new database in destination hierarchy. In migration once we specify source hierarchy, the top-level site in destination hierarchy data gathering process to identify the data to be transferred from the database of designated source site.


Destination Hierarchy

This is the site where migration process runs to transfer the data from old hierarchy.


Data Gathering

This is the process of identifying data in the source hierarchy to be transferred to new destination hierarchy. This process can be schedule and it can detect the changes in the data which was migrated earlier and might be needed to update in new hierarchy.


Migration Jobs

This is the process of specifying the object to be migrated and then manage them in new destination hierarchy.


Client Migration

In this data would be transferred which configuration manager client uses in database of old hierarchy to database of new current branch destination hierarchy.


Shared Distribution Point

These are the distribution point from old hierarchy which would be use in new destination hierarchy during migration period.


Monitoring migration

The progress and success of the migration can be monitored from the Migration node in the management console.


Stop gathering data

When there is no data to be transferred from old hierarchy then option can be configured on destination hierarchy to stop the data gathering process.


Clean up migration data

To complete migration activity clean up migration data process should be run to remove information of old hierarchy from new destination hierarchy.


Please share feedback in comment box.

Windows Server Roles and Features for SCCM Site Server and Site System


Before to start installation of any site server or site system’s role of Configuration Manager it is better to have below Windows server features and roles installed and enabled as it requires system restart.

Here are the information on basic feature and roles listed out in tabular format to understand better.


Require Windows Server features to be installed and enabled:


FeaturesSite Systems
.Net Framework
ASP.Net
HTTP Activation
Non-HTTP Activation
Windows Communication Foundation
Background Intelligent Transfer Services (BITS)Management Point
BranchCacheDistribution Point
Data DeduplicationDistribution Point
Remote Differnerials Compressions (RDC)Site Server or Distribution Point


Require Windows Server roles to be installed and enabled:


RolesSite Systems
Windows Deployment Services (WDS)PXE Point (For OS deployment)
Windows Server Update Services (WSUS)Software Update Point (For Software Update deployment)
Web Server IIS
Common HTTP Features
Application Development
Management Tools
Security
Distribution Point
Management Point
State Migration Point
Fallback Status Point
Software Update point

Please share feedback in comment section

Everything about extending Active Directory Schema to publish SCCM Site

Extending active directory schema creates new container in Active Directory Database with several attributes which configuration manage can use to publish information which later SCCM client can use them for several purpose.


Points to be considered for extending Active Directory Schema,


  1. Benefit of extending Active Directory schema for publishing SCCM Sites
  2. Prerequisites for extending Active Directory schema
  3. Steps to extend Active Directory Schema
  4. Devices and clients which do not use the Active Directory Schema
  5. Active Directory classes and attributes for SCCM

Will see them in brief,


Benefit of extending Active Directory schema for publishing SCCM Sites :


  • Configuration manager clients can easily find out the information of SCCM sites using different attributed like site code, Software update server information or any other published information in Active Directory
  • It helps clients to locate content servers
  • Client could find the Management Point from Active Directory if schema extended
  • Port information for clients to be used which are stored in Active directory
  • Site public key is store in Active Directory if schema extended which help to communicate between two different primary sites

 Prerequisites for extending Active Directory schema :


  • Account which is going to be user for schema extension should be part of Schema Admins and Domain Admins


Steps to extend Active Directory Schema :


Below two steps to be followed to extend the schema,


Step 1 – Extend Schema


  • Using extadsch.exe tool
    • Log in with Schema Admin / Domain Admin and open CMD with high elevation
    • Copy extadsch.exe tool from Configuration Manger installation media. This would be available under SMSsetup\bin\x64. (this exe can be directly called from media as well)
    • Run the exe from copied location
    • Verify extadsh.log for details
  • Using LDIF file
    • Log in with Schema Admin / Domain Admin and open CMD with high elevation
    • Copy “configmgr_ad_schema.ldf” to local drive from SMSsetup\bin\x64 on Configuration Manager media
    • Edit file to replace instance of DC=x with “DC=test,DC=SCCMinfo,DC=com” ( considering here the FQDN is “test.sccminfo.com”
    • Then run below command to import the content of this ldf file to Active Directory
      • ldifde -i -f configmgr_ad_schema.ldf -v -j “%temp%”
    • Verify the log to check if schema is successfully extended

Step 2 – Create System Management Container in Active Directory


  • Under system account create container name “System Management” with account having permission to create object.
  • Under Properties of container “System Management” go to Security and give full control to computer account of all Site Server
  • Select option to this Object and all child Object

Devices and clients which do not use the Active Directory Schema :


  • MacOS Client computers
  • Mobile devices which are managed by Exchange Server connector
  • Mobile devices enrolled by Configuration Manager
  • Mobile devices enrolled by Microsoft Intune
  • Mobile device legacy clients
  • Windows clients which are configuring for internet only client management
  • Windows client which are detected by configuration Manager to be on the internet

Active Directory classes and attributes for SCCM:


  • Classes
    • cn=MS-SMS-Management-Point
    • cn=MS-SMS-Roaming-Boundary-Range
    • cn=MS-SMS-Server-Locator-Point
    • cn=MS-SMS-Site
  • Attributes
    • cn=mS-SMS-Assignment-Site-Code
    • cn=mS-SMS-Capabilities
    • cn=MS-SMS-Default-MP
    • cn=mS-SMS-Device-Management-Point
    • cn=mS-SMS-Health-State
    • cn=MS-SMS-MP-Address
    • cn=MS-SMS-MP-Name
    • cn=MS-SMS-Ranged-IP-High
    • cn=MS-SMS-Ranged-IP-Low
    • cn=MS-SMS-Roaming-Boundaries on
    • cn=MS-SMS-Site-Boundaries
    • cn=MS-SMS-Site-Code
    • cn=mS-SMS-Source-Forest
    • cn=mS-SMS-Version

Key information to note :

  • Active Directory schema extension is one-time activity and once done cannot be reversed.
  • It is not required to extend Active Directory schema but if extended Config Manager clients can be benefited from it.

Please share feedback in comment box

Securing SCCM IIS Configuration and SCCM Management Point Configuration

Key points on securing IIS


There are roles in SCCM which require IIS. And configuring IIS is one of the important ask for any SCCM implementor as configuring IIS component which are not at all require might put the SCCM infrastructure in risk for attacks.


Here are listing out key point to be considered while configuring IIS for roles in SCCM,


  • Install and enable only require component of IIS.
  • Enable HTTPS for sits system roles for the communication.
  • Setup CTL (Certificate Trust List) in IIS.
  • Add only CA (Certificate Authority) to the CTL which are use by Configuration Manager for accepting the client’s communications.
  • Do not select to put IIS on computer running site server as site servers computer account is having local admin rights on all computers having site systems roles installed.
  • Do not put any web-based application on IIS server which is being used for Configuration Manager as poorly configured application open the path for attackers to gain access to configuration manager environment.
  • Use custom website if at all there is need to run other web application with set-wide setting.
  • In case of using custom website delete default virtual directory.
  • Configure custom header to disable MIME sniffing.

Key point on securing Management Point


Securing Management point is very important as this is site system which is used to have communication between clients and site servers.


  • Best practice to assign client to the management point for same site other than management point of another site.
  • In case of migration from earlier site to current branch, migrate the clients on the management point to new site as soon as possible.

Please leave comment for any suggestions or corrections.

Securing SCCM Site Server and SQL Server


Points on Securing Site server installation


  • It is not required to install any of the Configuration Manager sites directly on domain controller. Install site on member server as Configuration Manager maintain the local account in local SAM (Security Account Management) Database. This help to prevent direct attack on Domain Controller.
  • Do not install Secondary Site over the network, instead run the Secondary Site installation by using option User source file at the following location on secondary site computer (most Secure). This way of installation prevents the data or source installation files getting tamper over the network before start of installation.  
  • Make sure to have correct permission set on root drive where site server installation is going to take place. This way you will secure the normal users modifying or accessing contents of configuration manager. By default, site installation inherit permission from root drive.

Points on securing SQL installation


It is very much important to secure SQL database as all the contents of configuration manager get stores in SQL DB in backend. This help prevent attacker gaining access to configuration manager.


  1. Make sure not to use SQL DB for any other application as increasing access to the DB can put the Configuration Manager Database in risk for attacks.
  2. Always use windows authentication mode for login to the DB instead mixed mode as using mix mode would always have some risk for attack surface.
  3. For Secondary server make sure to have latest version of SQL express as when installing Secondary Site from Primary Site it installs SQL express with previously downloaded version.

General requirement for SQL server installation:


  • Computer account of Database Site server should be part of local administrator group.
  • If to install SQL server using Domain user account, make sure site server’s computer account is configured as SPN (Service Principal Name) which is published in active directory.

Please share comment to improve us in comment section

Key points to secure SCCM Site Server

Here are the key points on consideration of securing Configuration Manager Sites administration:

  • Make sure to download the source file from trusted location and secure the network share where all these source files would be saved for the site installation.
  • Extending Active Directory Schema is not requirement, but it provide secure environment for the SCCM infrastructure.
  • Communication between site systems roles and SQL server is not secure, to make it secure either IPsec can be used or use SMB signing to make sure data is not tempered before clients download and use them.
  • At the time of Site installation, it creates below security groups on which doing any changes should be prevented.
    • SMS_SiteSystemToSiteServerConnection_MP_<SiteCode>
    • SMS_SiteSystemToSiteServerConnection_SMSProv_<SiteCode>
    • SMS_SiteSystemToSiteServerConnection_Stat_<SiteCode>
  • In case of non-active directory environment trusted root key must be managed properly by manual configuration to reduce the risk of client contacting untrusted Management point.
  • Advantage of non-default port can be taken as it is difficult for the attacker to attack the configuration manager environment. If decided to use non-default port need to plan properly and them through the hierarchy.
  • Avoid installing all or maximum site system on one computer as it would become single point of failure.
  • Configure Static IP address as it would be easy to protect and difficult to attack.
  • Do not allow installation of any other application which is not needed to avoid risk of attack.
  • Enable the signing and encryption option on Site
  • Allow only limited users to manage with required access and monitored them on periodically.
  • Make sure to secure Configuration Manager backup file as it has sensitive information which attacker can use to exploit.
  • Secure network location where you keep all configuration manager data like import/export objects, files, packages repositories.
  • Remember to remove certificate manually wherever site systems roles are not working properly, need uninstallation to fix issues, etc as this helps to remove the trust which was established. ( Affected site system servers’ certificate should be removed from other site systems in Trusted people certificate store)
  • Do not configure site systems which communicate to intranet and perimeter network as it removes boundary between intranet and internet.
  • By default, site system initiate connection to Site server, this is very risky when site system is located on perimeter network which is untrusted network. To avoid enable option Require the Site server to initiates connections to this site system.
  • When supporting internet-based client using web proxy server, need to use SSL bridging to SSL with termination and authentication. Configuring SSL with termination allow internet package to be inspected before they are forwarded to internet network.

Please share the comments in comment box

MPList for Configuration Manager Client

MPList


MP list is nothing but list of the Management point sets in order as per the priority that configuration manager client is identified earlier. This is the list client uses as favourite source for service location to find the Management point. This list gets build on basis of network location in which client resides. This list is stored in WMI on local computer.


There are two types of MP list describe below,


Building initial MP list – this list gets build in below order


  • First includes management point found at time of client installation.
  • Client look for ADDS (Active Directory Domain Service) for published management point.
  • If client does not get MP by above two approach, then it checks DNS and WINS.
  • In this list some of other Management points information might not be there.

Organizing MP list – this list prioritises in below order


  • Proxy – This is the Management point at Secondary Site
  • Local – This is the Management point which is define by boundary group or by assigned site.
  • Assigned – This could be any Management point of site system under client assigned site.

Selecting Management point to use


For general purpose and commonly clients use the management point in below order according to the current network locations they fall into.

  1. Proxy Management point
  2. Local Management point
  3. Assigned Management point

But in case of management point registration and certain policies messages client uses assigned management point only and other communication would be sent to proxy and local Management point.


Client always try to connect with HTTPS secure connection if client is enabled for HTTPS


 Keynote:
 
 Once Client found MP it would continue to use same until:
    25 hours passed.
    Client is not able to connect MP for five tries over period of 10 mins.

Please give your feedback on the information in comment box.